Building a Voice App in 30 minutes

You have mastered building web apps. Maybe even building mobile apps. But what about these smart speakers that are now sitting in people’s living rooms? What about our new found ability to talk to apps on our phones?
Did you find yourself wrestling with native APIs and small platform-specific details when you tried building a skill for Alexa or an action for Google Assistant? This doesn’t have to be the case. Building of Voice App can be simple and we can do it in 30 minutes.
To get started quickly - lets assume that we let the big guys - Amazon and/or Google - take care of the Speech Recognition. Doing this allows us to take advantage of a platform with error rates that are close to humans. It also allows us to deploy whatever we build to voice enabled devices by either company.
Lets also assume that we will use JavaScript for building the Voice App - it is becoming the go-to language for building most User Interfaces, and there is also a lot of tooling built using it to support Voice Apps. Continuing with that, we will build the App using the UI focused Voice Framework - Violet.
Set things up
The first step involved making sure that Node.js is installed. Once you are done with that, lets create a project. Lets say we want the app to help with planning Game Nights. So we create a folder for the project, and then tell the Node package manager, npm, to initialize a project and install the Violet dependencies:
mkdir gameNight
cd gameNight
npm init -y
npm install violet --save
Create the Skeleton for the App
Now, all you need to do is to create a file called server.js, load the violet module and initialize it. This looks something like:
// Load the Violet Module
const violet = require('violet').script();

// App Logic
var app = {
  //...
};


// The Conversation Flow (with a pointer to the app logic)
violet.addFlowScript(`<app>
  <!-- -->
</app>`, {app});
The app doesn’t do much yet, but it sets up a place to put your Logic separately from the View, i.e. the Conversation Flow. You can run this app by typing npm start.
The Conversation Flow is the part of your app that defines how the conversation will take place - what the user can say and how your app will respond in return. When your app needs to ask follow up questions to your user, you would ideally add these interactions here. The conversation flow is also the part where Voice Designers will focus on and this part is often loaded from a separate file. The App Framework manages loading the conversation and tracking the state so that you don’t have to.
Define the Conversation
We now have the basics working, so lets build out what kind of a conversation the app will have with its users. Lets say we want the app to help with planning Game Nights.
We could write out a script of how a user might want to start asking:
User: What can you do?
App: I can help you with planning Game Nights
We can implement the above easily, by telling the framework that the user is going to be making a choice, during which we will be expecting a prompt from the user, and the app should respond back by doing a say. The conversational flow ends up looking like:
<!-- flowScript -->
<choice id="launch">
  <expecting>What can you do?</expecting>
  <say>I can help you with planning Game Nights</say>
</choice>
<!-- flowScript -->
Adding an id allows us refer the element later, and in this case we use the reserved id: launch which means that the above script is also triggered when the user just launches your app, for example by saying: “Alexa, open Game Night”.
So, lets now plan a more central conversation with the App. It could look like:
User: What game nights have already been planned?
App: Let me see.
App: Would you like to hear of game nights that are upcoming or in the past?
User: In the past.
App: I had a game night scheduled on Thursday at 5pm where Chess was played.
The above is a little more involved, and supporting it can be done by adding a nested decision for the user to make when being we ask a question. Writing out the flow give us:
<!-- flowScript -->
<choice id="list">
  <expecting>What game nights have already been planned?</expecting>
  <say>Let me see.</say>
  <decision>
    <ask>Would you like to hear of game nights that are upcoming
            or in the past?</ask>
    <choice>
      <expecting>In the past.</expecting>
      <resolve value="app.getPastGameNights(response)"/>
    </choice>
    <choice>
      <expecting>Upcoming.</expecting>
      <resolve value="app.getUpcomingGameNights(response)"/>
    </choice>
  </decision>
</choice>
<!-- flowScript -->
In the above, the resolve tag tells the framework to call application logic that was provided earlier.
Test the App
We have a simple conversation built above. It helps to test things often - especially with Voice Apps. With that in mind, lets create dummy App Logic so that the code runs and we can test it.
// An Extremely Simple Model (to hold the data)
var model = {
    pastGameNights: [],
    futureGameNights: []
}

// The Controller
var app = {
  getPastGameNights: (response)=>{
    response.say('Dummy implementation');
  },
  getUpcomingGameNights: (response)=>{
    response.say('Dummy implementation');
  }
}
Now when you type npm start in the console you can run the app. Violet comes with a built in web tooling and should let you run test the code on your local machine.
Go to the url - likely http://localhost:8080/ - in your web browser. Feel free to pick an intent (think of it as a bit of speech that a user would make) and send a request.
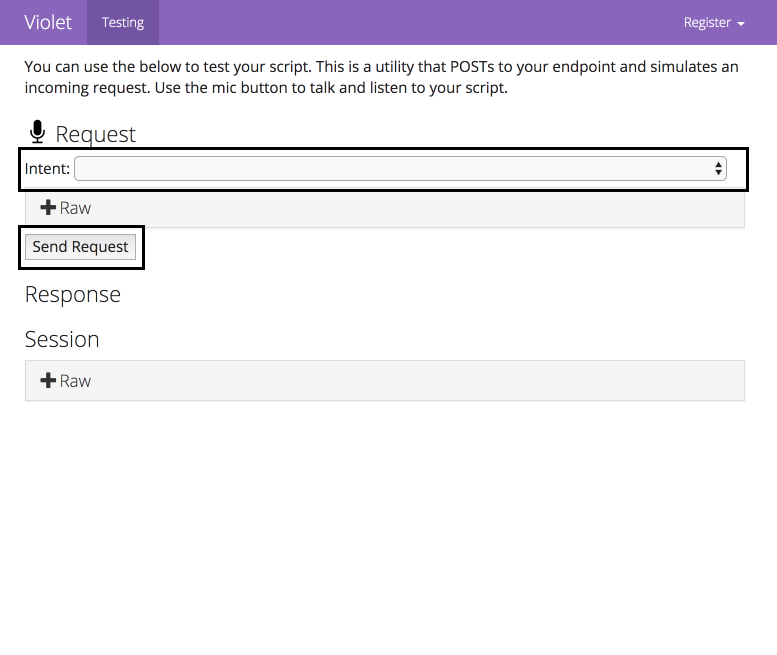
The request will mock how an external service will talk to your Voice app that you are just running.
Now you can test the app - make sure the conversation flows as expected!
Building the Logic
Now that we have the basic conversation built, we can build the App Logic. From the earlier snippet, all we need are two methods getPastGameNights(...) and getUpcomingGameNights(...).
If we just assume that the data will be in memory, the logic becomes as simple as:
// An Extremely Simple Model
var model = {
    pastGameNights: [],
    futureGameNights: []
}

// The Controller
var app = {
  getPastGameNights: (response)=>{
    var results = model.pastGameNights;
    if (results.length == 0) {
      response.say('Sorry, I did not have anything scheduled');
    } else {
      var dt = results[0].startTime;
      response.say(`I had a game night scheduled
          on ${utils.getDayAndMonth(dt)}
          at ${utils.getTime(dt)}
          where ${results[0].game} was played`);
    }
  },
  getUpcomingGameNights: (response)=>{
    var results = model.futureGameNights;
    if (results.length == 0) {
      response.say('Sorry, I do not have anything scheduled');
    } else {
      var dt = results[0].startTime;
      response.say(`I have a game night scheduled
        on ${utils.getDayAndMonth(dt)}
        at ${utils.getTime(dt)} to play ${results[0].game}`);
    }
  }
}
We do need to think about how we would add data to the above model, and that can be done in many ways. You could build our your web/mobile interface for that, or you can access a database (Violet provides plugins Postgres and Salesforce). Also, feel free to see the next article on how to go about getting inputs for your Voice App.
Deploy the App
You should now be able to test the app again and make sure that it is working as you would expect.
The next step is in deploying the code to run on a server that is visible on the internet - for example, using a service like Heroku.
Once deployed, you will need to register your app with Amazon’s Alexa service or Google’s Dialogflow. To do this, open the web tooling of the deployed service, click on the ‘Register’ in the menu, select the appropriate service that you are interested in, and follow the instructions from there.
After registering your app, you should be able to test it using the testing features provided by Alexa and/or Dialogflow.
Alternatively, before deploying your app, you can also test it locally by connecting it to Alexa/Dialogflow by using a service like ngrok.
Polishing the UX
Now that we have the app deployed, we can start to use it. Often, this is where we notice that the app doesn’t feel right, and we have to make a number of small modifications to it. These changes usually include:
- accepting more inputs from the user - often done by adding more
expectingelements within onechoicestatement (see example); - changing how the app responds to make the conversation feel more natural;
- realizing that the AI can get confused with words that sound similar (like ‘how’ and ‘wow’), so changing prompts to the user and accepting different inputs; and
- adding a use case or two once we start using the app - people do use voice apps a little differently than their web and mobile counterparts; and
- refining edge cases.
Where we go from here
Hope you found this helpful. In the next article we look into how we could get inputs for your Voice App.
But, before that try building a Voice App yourself and let me @VineetSinha know how it goes.
Code: See the code for this project here: gameNight.js.
Image Credit: Alexa Voice App with People by Brother UK.
Updated: 9th Mar - added link to follow up post.
Updated: 22nd Aug - minor details to align with the Violet 1.0 release.
I am writing new articles once every 2-3 months. Interested in getting notified? Sign up here.